You've just migrated your website from shared hosting to a shiny new VPS. You pull out your phone, type in your domain — and there it is, the new site, looking perfect. Then you open your laptop browser
Why Your New Website Isn't Showing Up — A DNS Propagation Guide
You've just migrated your website from shared hosting to a shiny new VPS. You pull out your phone, type in your domain — and there it is, the new site, looking perfect. Then you open your laptop browser and stare at the old site, blinking in disbelief. Same domain. Completely different result.
This is one of the most common and most confusing experiences in web infrastructure. The good news: it is entirely explainable, and entirely fixable. This guide walks you through exactly what happened during a real migration — from the first confused refresh to the final fix — and gives you a mental model that will serve you well for every deployment you do in the future.
The internet doesn't have one address book. It has thousands of them, and they don't all update at the same time.
The Root Cause: How DNS Actually Works
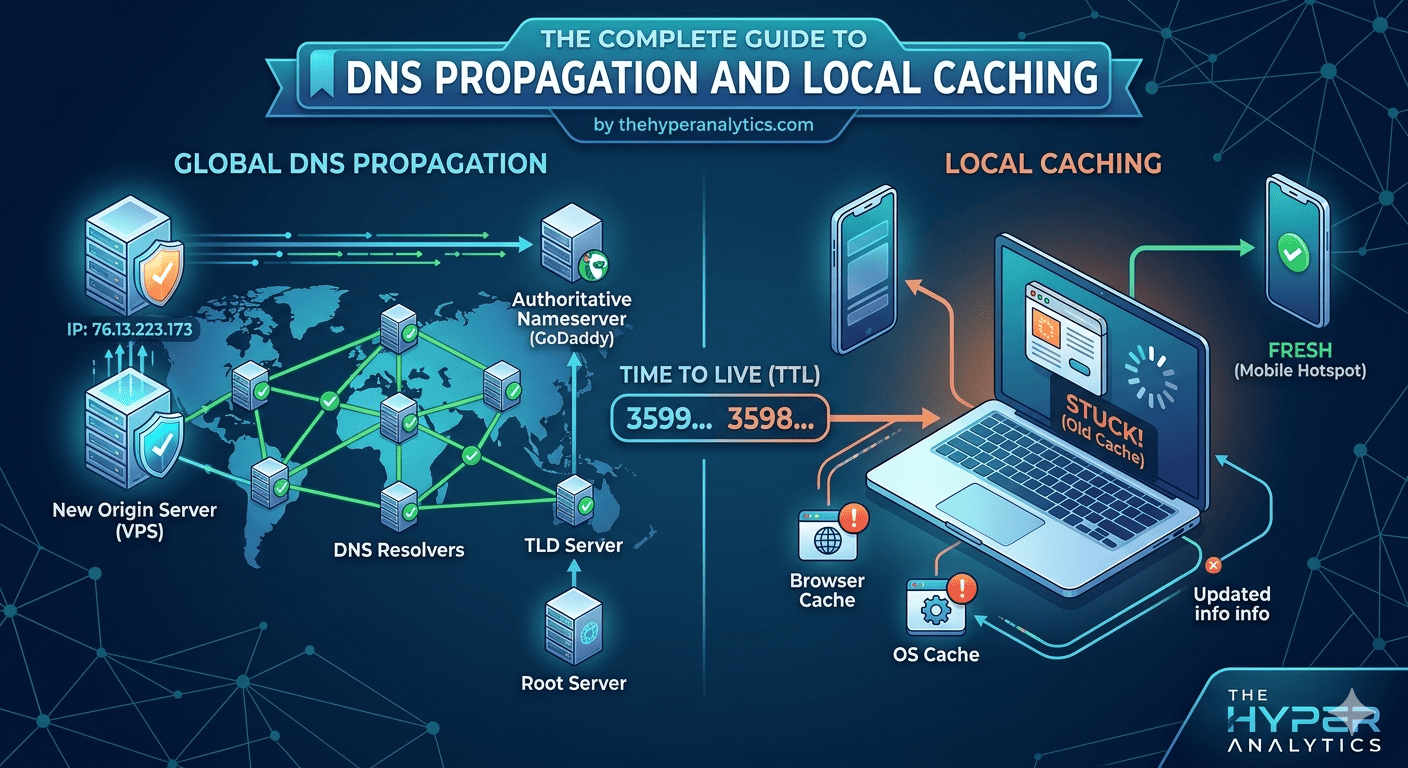
When you type a domain name into a browser, your device doesn't magically know which server to connect to. It has to ask. This process of turning a human-readable name like thehyperanalytics.com into a machine-readable IP address like 141.136.39.213 is called DNS resolution — Domain Name System resolution.
Here's the crucial thing most people don't realise: there is no single, central DNS database. Instead, DNS records are cached (temporarily stored) at multiple points along the chain — your browser, your operating system, your router, and your ISP's DNS servers. Each cached copy has a countdown timer called a TTL (Time to Live). When the timer hits zero, the cache fetches a fresh copy. Until then, it serves whatever it has stored — even if the real record has changed.
The resolution chain works like this, moving from left to right until a cached answer is found:
- Browser cache — fastest, expires in minutes
- Operating system / systemd-resolved — expires based on the record's TTL
- ISP DNS resolver — can cache for hours; the most common culprit for slow propagation
- Authoritative DNS server — the source of truth, set by your domain registrar
If any layer has a cached answer, it stops there and returns it — even if that answer is outdated. This is exactly what causes the "new site on mobile, old site on laptop" phenomenon.
What Was Happening In Our Case
When we migrated thehyperanalytics.com from Hostinger shared hosting to a VPS, we updated the DNS A record to point to the new VPS IP address. Here is what each layer was doing:
- The authoritative DNS (domain registrar) had the new VPS IP immediately after the change
- Google's public DNS (
8.8.8.8) had already fetched and cached the new record - Our mobile phone — with a fresh DNS cache — resolved the new IP and showed the new site
- Our laptop's ISP DNS was still caching the old Hostinger shared hosting IP (
141.136.39.213)
Running dig thehyperanalytics.com on the laptop revealed a TTL countdown of 658 seconds remaining on the cached record. That number is literally the time left before the ISP's DNS server goes back to the authoritative source to fetch the updated record. Until that timer hits zero, anyone whose ISP cached the old record will keep seeing the old site — no matter how many times they hard-refresh.
What is TTL? Time to Live is a value (in seconds) set by the domain owner that tells DNS resolvers how long to cache a record before checking for updates. A TTL of 3600 means "keep this cached for one hour." Low TTLs (300 seconds) propagate changes fast but increase DNS query load. High TTLs (86400 seconds) are efficient but slow to propagate changes. Before a planned migration, experienced admins lower the TTL to 300 seconds a full day in advance, then restore it after the move is stable.
The Diagnostic Process, Step by Step
When your site isn't updating after a migration, the key is to methodically rule out each layer of the stack. Here is the exact process to follow.
Step 1 — Rule out the browser cache
Try a hard refresh (Ctrl+Shift+R on Windows/Linux, Cmd+Shift+R on Mac) and then open an incognito or private browsing window. If the new site appears in incognito, your browser was the culprit — just clear the cache and you're done. If the old site still appears in incognito, the problem is deeper than the browser and you need to dig further.
Step 2 — Check your OS DNS service
On Linux with systemd (Ubuntu 22.04 and later), check the status of the DNS resolver:
systemctl status systemd-resolvedIf it is active and running, flush its local cache:
sudo systemd-resolve --flush-cachesYou will see a "Flushed all caches" confirmation in the service log. This clears what the OS has stored — but it does not clear what your ISP's DNS server has cached upstream.
Step 3 — Find out which IP your machine resolves
Run dig against your domain and check the ANSWER SECTION:
dig thehyperanalytics.comThis tells you exactly which IP your machine is currently using, and also shows the TTL countdown — the number of seconds until the cached record expires and a fresh lookup is made.
Step 4 — Compare against a trusted public DNS
Query Google's and Cloudflare's public DNS servers directly, bypassing your ISP entirely:
dig thehyperanalytics.com @8.8.8.8
dig thehyperanalytics.com @1.1.1.1
If these return a different IP than your local dig result, your ISP's DNS cache is stale — and that is your problem. If they match, the issue is on the server side and you need to investigate the hosting configuration.
Step 5 — Check for a hosts file override
The /etc/hosts file on Linux (and its equivalent on other systems) can manually map a domain to an IP, bypassing DNS entirely. Check whether your domain appears in it:
grep -i "hyperanalytics" /etc/hostsIf your domain is listed with an IP, that entry will always override DNS — regardless of what any DNS server returns.
The Fix: Overriding DNS with /etc/hosts
Once we confirmed that Google's DNS had the correct VPS IP, but our ISP's DNS was still returning the old Hostinger shared hosting IP, we had two options: wait up to 48 hours for full global propagation, or force the machine to use the correct IP immediately. We chose the latter.
The /etc/hosts file is a local DNS override table. Entries here take priority over all DNS queries — your machine checks this file first, before asking any DNS server. Adding your domain here with the correct IP is the fastest way to use the new server while waiting for propagation to complete.
Open the file with elevated privileges:
sudo nano /etc/hostsAdd this line at the bottom, replacing YOUR_VPS_IP with your actual VPS IP address:
YOUR_VPS_IP thehyperanalytics.com www.thehyperanalytics.comSave with Ctrl+O, then exit with Ctrl+X. Flush the OS DNS cache one more time to clear any lingering entry:
sudo systemd-resolve --flush-cachesReload your browser. You should immediately see the new site, because your machine is now bypassing the stale ISP DNS and connecting directly to the VPS IP you specified.
Important: Remember to remove the hosts file entry once DNS has fully propagated — usually within 24 to 48 hours. Otherwise your machine will keep using the hardcoded IP even if the IP changes again in the future. You can verify propagation is complete by running
dig thehyperanalytics.comand checking that it returns the same IP asdig thehyperanalytics.com @8.8.8.8. When they match, remove the line from/etc/hosts.
Why Did Mobile Show the New Site First?
This is the part that causes the most confusion. If your mobile phone is on the same Wi-Fi network as your laptop and shows the new site, while your laptop shows the old one, there are two likely explanations.
Your mobile was on cellular data. Mobile data routes through your carrier's DNS, not your home ISP's DNS. Different providers cache DNS records on different schedules, so your carrier may have already fetched the new record while your home ISP hadn't yet.
Your mobile had a cold cache. If you hadn't visited the site on your phone recently, there was no cached entry at all. The phone resolved fresh, got the new IP, and connected to the new server immediately. Your laptop, by contrast, had visited the site previously and had the old IP comfortably cached with time still left on its TTL.
Quick Reference: Linux DNS Commands
| Command | What it does | When to use it |
|---|---|---|
dig domain.com |
Shows the IP your machine resolves, plus TTL remaining | First diagnostic step after any DNS change |
dig domain.com @8.8.8.8 |
Queries Google's DNS directly, bypassing your ISP | Compare against your local resolution to spot stale caches |
dig domain.com @1.1.1.1 |
Queries Cloudflare's DNS directly | Second opinion on propagation status |
resolvectl query domain.com |
Shows systemd-resolved's view of the record | Verify OS-level resolution on modern Ubuntu/Debian |
sudo systemd-resolve --flush-caches |
Clears the local OS DNS cache immediately | After updating DNS records or editing /etc/hosts |
systemctl status systemd-resolved |
Shows the DNS service status and recent activity log | Confirm the service is running; check flush history in logs |
curl -I https://domain.com |
Shows the actual HTTP response headers from the server | Confirm which server is actually responding to requests |
grep -i domain /etc/hosts |
Checks for local overrides in the hosts file | Rule out manual IP pinning before anything else |
Pro Tips for Future Migrations
Lower your TTL before migrating. At least 24 hours before you plan to switch servers, lower your domain's TTL to 300 seconds (5 minutes). This means that once you update the A record, the old cached records expire within 5 minutes everywhere instead of potentially 24 to 48 hours. After the migration is stable, raise the TTL back to 3600 or higher.
Verify propagation status globally. Visit whatsmydns.net and enter your domain. It shows what DNS resolvers around the world are currently returning — a quick visual check of how far the new record has spread.
Keep a note of your old and new IPs. During a migration, write down both IPs before you start. If something goes wrong, you'll want to be able to compare what DNS is returning versus what it should be returning — without having to dig through your hosting panel under pressure.
The Bigger Picture
The moment of confusion — "why does my phone show the new site but my laptop doesn't?" — is actually one of the most instructive experiences in understanding how the internet works. The web is not a single, consistent system. It is a collection of caches, resolvers, and propagation waves, each moving at a different speed.
When you make a DNS change, you are not flipping a switch. You are dropping a pebble into a pond, and the ripples spread outward — to Google's resolvers within minutes, to most ISPs within a few hours, to the slowest corners of the network within 48 hours. Your mobile on cellular data might catch the wave in minutes. Your laptop behind a home ISP might not see it until the next day.
Understanding this makes you a far more effective developer, sysadmin, or website owner. You stop panicking when you see the old site. You know exactly which commands to run to diagnose where the stale data lives. And you know the /etc/hosts trick to unblock yourself immediately without waiting.